Top 5 Microsoft 365 Productivity Tools
You’re Probably Not Using

Microsoft 365 includes far more than Word, Excel, and PowerPoint. Many businesses pay for powerful Microsoft 365 productivity tools without fully using the features designed to improve collaboration, automate workflows, and save time.
In this guide, we break down five Microsoft 365 productivity tools you’re probably not using—and explain how businesses can use them to work more efficiently, reduce manual tasks, and improve day-to-day operations.
Microsoft 365 Power
The Microsoft 365 Power functions offer workflow capabilities with automated processes to keep you organized and present a more professional image to shareholders, employees, and clients.By leveraging these Microsoft productivity tools, you can streamline your operations and enhance overall efficiency.
The Power features include:
Power Automate
A built-in efficiency feature, Power Automate allows you to create automated workflows for your apps and services. You can set notifications, sync files, and collect data with complete control over the workflows.
For example, a healthcare provider may use Power Automate to automate test results into enterprise health record systems. Businesses can also automate help desk processes and support.
Power BI
Power BI, or business intelligence, is a helpful tool for data insights and reporting. You can create stunning visualizations to present data findings to stakeholders or promote them across your organization’s channels. It also comes with security features to ensure that your information is secure, even if you’re sharing to external parties.
To give you an idea of how Power BI could be used, imagine a company using the Sales Scorecard to get a complete overview of sales performance from the top down. There’s also a sales analysis dashboard that reveals where the best prospects are in the pipeline.
Power Apps
Power Apps enables you to create customizable apps for your business. It provides all the tools you need to create an app for your business and your clients, right at signup, and integrates with Excel and cloud storage like Dropbox or Google Drive.
Case in point, the learning Management system in Power Apps can help businesses enhance employee learning and development with quick and customizable apps. It has 4 modules – content management, comprehensive evaluation, real time progress monitoring and applying for technology certifications.
2. Microsoft 365 Lists
The Microsoft 365 Lists feature is an easy one to overlook, but it’s an important tool to track, inform, and visualize your work in one centralized place. You can create an onboarding checklist for new employees to get off on the right foot, or plan event itineraries that you’re hosting.
But that’s not all. The app supports converting lists from Excel files with rules to automate the processes based on your data input. If anything is changed, you’ll receive a notification. Though this feature may seem simple, it’s a game-changer for your day-to-day organization.
3. Microsoft 365 Stream
You can get live streaming from any number of social media platforms, but few compare to the capabilities of Microsoft 365 Stream. You can create live events, sync with different channels and groups, and manage who watches your content.
4. Microsoft 365 Sway
Microsoft 365 Sway is an innovative way to elevate your presentations, newsletters, and proposals to make them more interesting and engaging, all without a presenter. No matter the type of document, you can use Sway to design multimedia-rich files with visuals and transitions that capture your audience’s attention. Sway offers both ready-made templates and customization options bolstered by AI to put your own spin on the design, as well as built-in features for sharing and online publishing.
5. Microsoft 365 Bookings
One of the most useful features, Microsoft 365 Bookings allows your clients to schedule appointments with your employees quickly and easily. Instead of endless email threads, clients can go directly to the calendar and block out time for a meeting. There are other calendar apps that allow customers to book time directly on your calendar, but they also have a monthly subscription fee. Why pay for it when you already have it with Microsoft 365.
Bookings also includes a customizable web page for clients to schedule your services or for coworkers to block meetings with each other. For example, you and your accountants can schedule meetings to discuss budgeting and billing.
Like other Microsoft 365 products, Bookings is available with a mobile app for quick and easy access. Plus, it syncs with your contacts list and sends automated notifications and reminders to minimize no-shows.
How to Use Microsoft 365 Bookings
Though it may not be as flashy as some of the other features, Bookings is an asset to your organization. Scheduling and managing appointments saves you time and provides the best possible experience for your clients and colleagues.
Here’s a step-by-step guide to setting up and using your Microsoft 365 Bookings, as well as some helpful tips to get the most out of the feature.
Initial Configuration
- Start at the Microsoft 365 admin center at https://admin.microsoft.com/ and login as Admin.
- Navigate to Settings > Org Settings > Bookings.
- Click “Allow your organization to use Bookings.”
Customizing Bookings
Bookings has numerous options to tailor it to your day-to-day business needs. For example, you can:
- Create a Bookings site for your IT staff or for HR to schedule appointments with employees
- Set organization meetings to virtual with Microsoft Teams
- Create Bookings calendars, schedule new appointments, and manage existing appointments from Teams
Bookings has three components:
- Booking page: This is where users can schedule appointments and share information via a link
- Web app: This is where calendar owners and admins can define schedules, appointment types, business hours, and availability
- Mobile app: This is a business-facing app that allows owners and admins to view appointments and access customer information
Calendar Setup
- Click this link for the initial calendar setup.
- The first time you use Bookings, you must create a calendar and set up your business.
- Select Get Started, then enter your business name and business type.
- Select Create Calendar
- Enter your business name and business type, then select Continue.
You’re now ready to set up Bookings!
Booking Page Creation
Bookings is intuitive for setting up your Booking Page.
- Click on the Booking Page link to the left.
- Set your preferences, including your personal data collection, usage consent, email notifications, theme, and company logo.
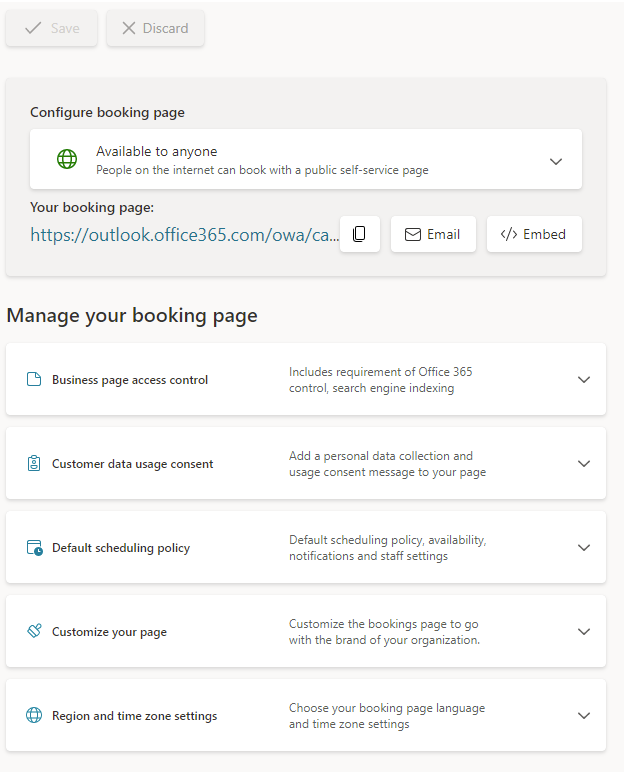
- When you’re finished, click Save and Publish.
Book an Appointment
If you want to create a manual booking, here are the steps:
- Select Calendar > New booking
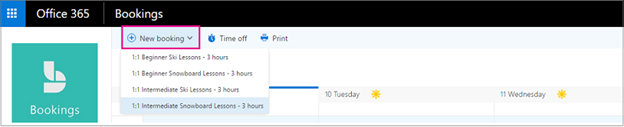
- Select the service that you’re providing.
- Enter the customer information, including the name, email, and phone number.
- Select the staff member who will be providing the service.
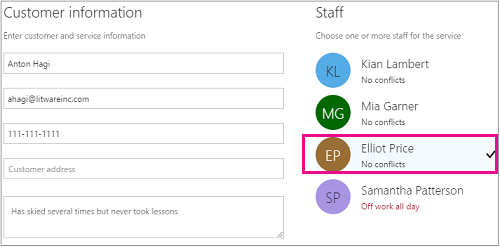
- Enter the details, including the date, time, location, and other information.
- Select Add an email reminder and select the time and recipient.
- Select Create Booking.
That’s it!
Get the Most Out of Microsoft 365 Productivity Tools
In today’s fast-paced business environment, optimizing time and improving efficiency is critical.Choosing the right productivity platform is just as important as using the right tools. We break this down in our comparison of Microsoft 365 vs Google Workspace for small businesses in 2026.
Microsoft 365 offers a powerful set of productivity tools designed to transform how businesses work. From streamlining data management and collaboration to enhancing video content and simplifying scheduling, these tools support a wide range of day-to-day business needs.
Many Microsoft 365 productivity tools are already included in business subscriptions—but often go unused. With the right configuration and guidance, organizations can unlock significantly more value from Microsoft 365 and improve productivity across teams.
Microsoft 365 delivers the most value when it’s actively managed, optimized, and secured as part of a broader managed IT services strategy that supports long-term business growth.
Interested in learning how Microsoft 365 can fit seamlessly into your business strategy? Book a call with us to discuss how our IT expertise can help you maximize the value of your Microsoft 365 subscription and support your local business growth.